Connect to VTScada – Adding a Web Anywhere Client Application
Sample Setup
The following guide outlines the steps for creating a VTScada Anywhere Client application in the Agilicus platform. These instructions are intended for VTScada deployments with version v12.1.30+ on Windows, Linux, and Android devices.
Overview
The following guide outlines the steps for creating a VTScada web application in the Agilicus platform. These instructions are intended for VTScada v12.1.30+ deployments on Windows, Linux, and Android devices.
If you require assistance for Safari and iOS device , contact us.
Step 1: Create the Application
From the left sidebar, expand Applications and select New:
- Application name. The chosen name will also be required to configure the VTScada Server list later in the instructions.
- a description of the application.
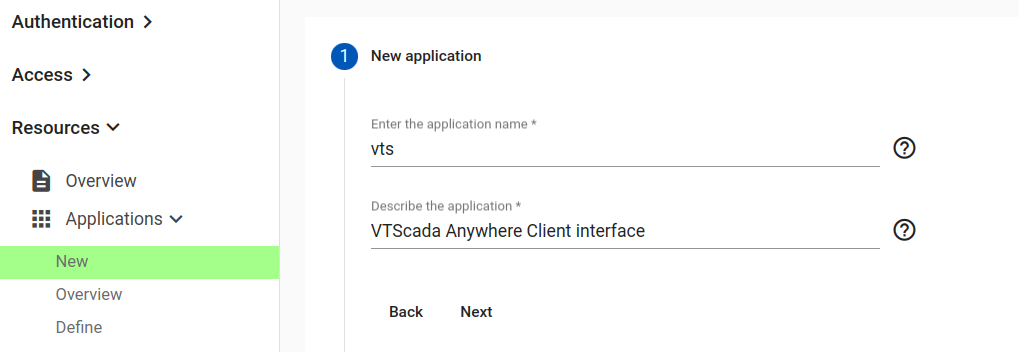
Click on Next to get to the “Hostname Aliases” section and accept the proposed Hostname, or specify a different one. (If different, will need to be applied to the VTScada Server address list)

Select the first option of “I access via NAME-OF-APP.subdomain.domain.name” and click on next.
First under “My application is accessed” select “from my site via an onsite connector”
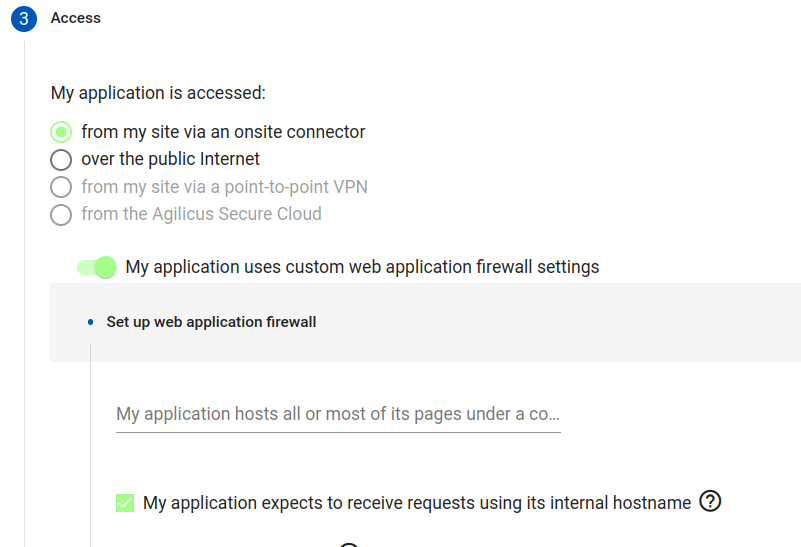
- Within “Set up web application firewall” select “My application expects to receive requests using its internal hostname”
Click on “Select connector”:
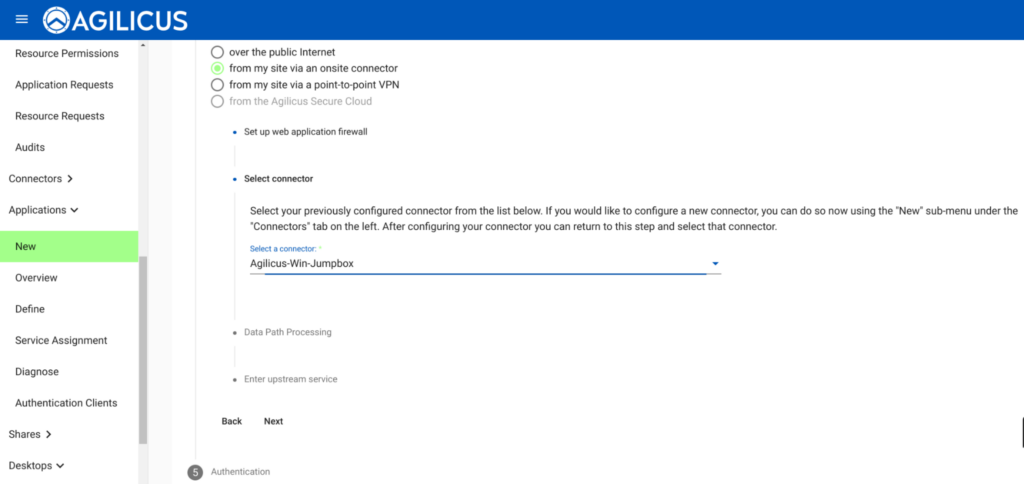
From the “Select a connector” drop down, pick the connector that you had previously created.

Within the “Enter the hostname” field, type in the hostname of the server that is hosting your VTScada web portal. This should be the same as your VTScada thick client.
In this configuration, the VTScada Server Setup and “Default” Realm server / and URLs point to an IP address of 192.168.10.15, and a TCP port of 80, with no SSL (Secure).
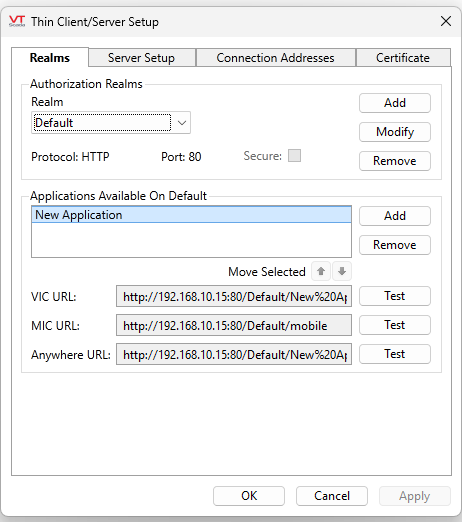
Click on Next to be taken to the “Authentication section”:
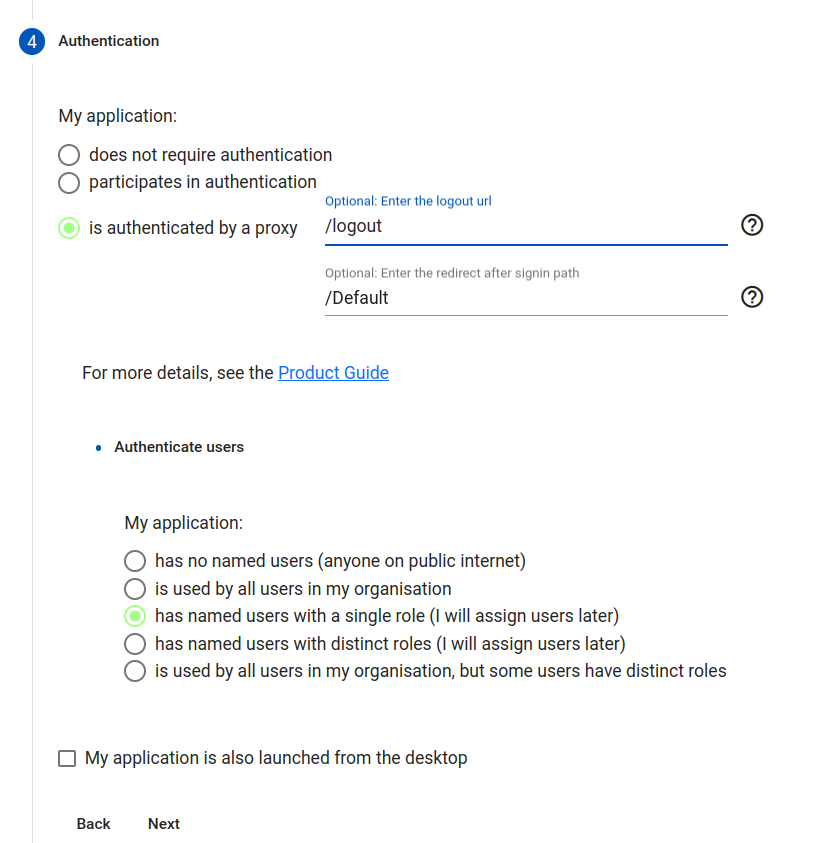
Select “is authentication by a proxy” and type in “/logout” (without the double quotes) into the “Enter the logout url” field.
We will also use the Optional “Enter the redirect after signin path” URL to redirect to the VTScada Server Realm page once users perform Authentication. Therefore, fill the value of the field with the name of the Realm ( eg: /Default )
Select “has named users with a single role (I will assign users later)” and click on Next:
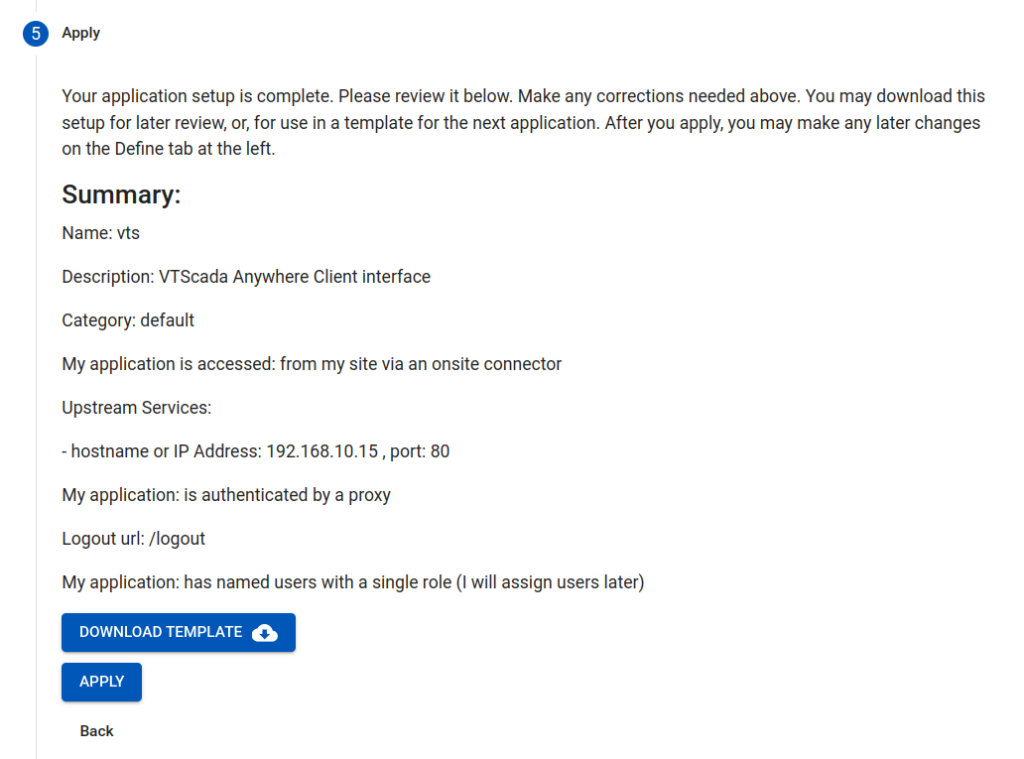
Select the APPLY button to finish off this section of the setup.
Step 2: Configure the Application
Click on “Overview” within the Applications section and select the Actions icon in the very far right hand side of the screen for the VTScada application that we just created:

After clicking on “Configure Application”, select the Proxy section
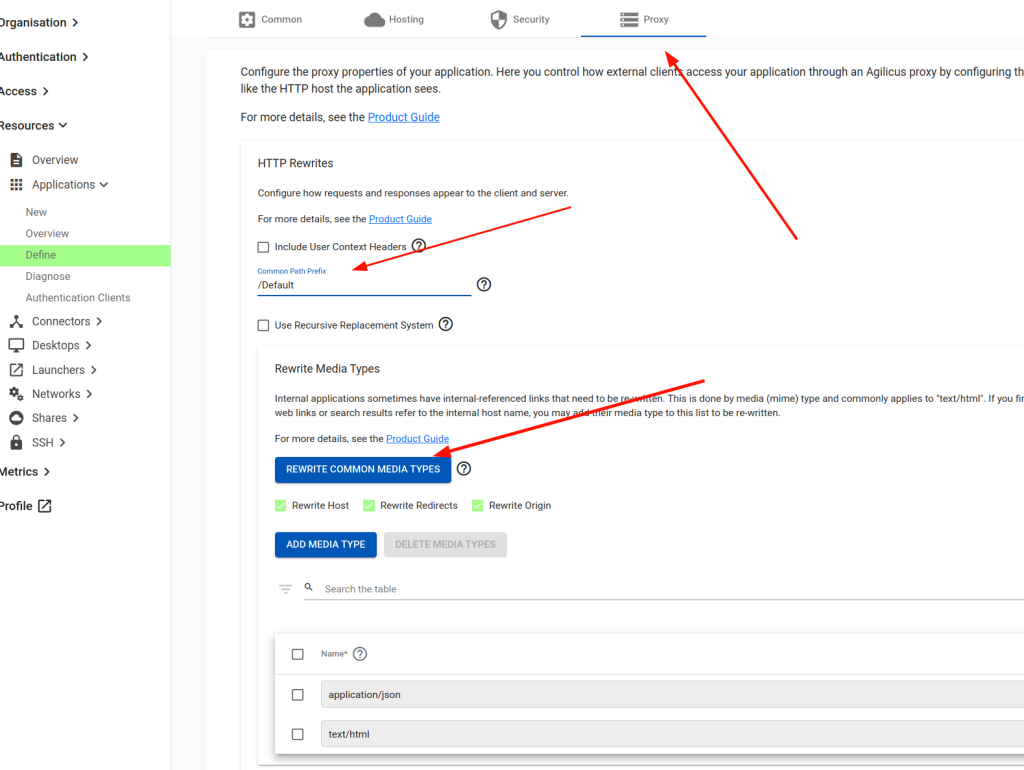
Within the Proxy section select the “Common Path Prefix” and input the Realm name. This will limit the Anywhere Client to the desired realm path unless allowed by the Firewall rules in the following steps. In this case, we use the path /Default which is our VTScada realm.
Click on “Rewrite Common Media Types” checkbox.
Next, select the “Security” section and scroll to the “Firewall Rules”
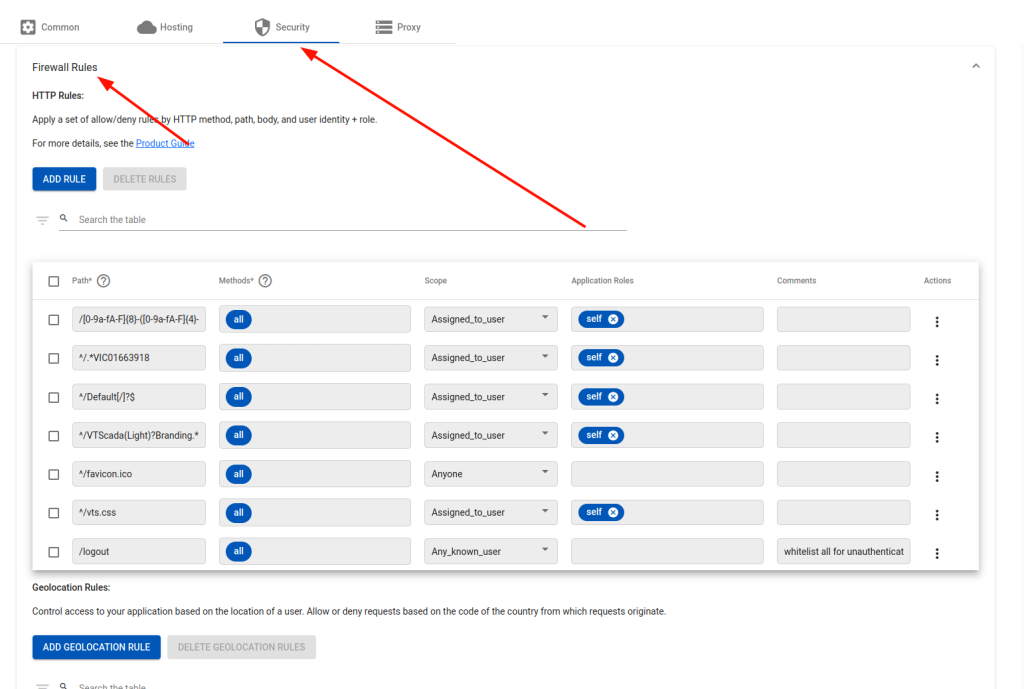
In the Firewall section, we will enter rules that will allow Authenticated Users with permissions to the “Self” role to access specific paths within the VTScada Anywhere Client. These specific path are explicit in order to match valid content within the VTScada Realm that may fall outside of the “Path Prefix” set in the previous step ( eg: /Default ). These paths contain various web objects such as Icons, CSS files, Images, Anywhere Client scripts, and specific paths to the Server realm GUUID.
If using Website uptime monitoring, we recommend making the standard website browser icon “favicon.ico” available without authentication so that Web monitoring software can easily test end to end website uptime and availability by fetching this object.
The following rules are recommended:
/[0-9a-fA-F]{8}-([0-9a-fA-F]{4}-){3}[0-9a-fA-F]{12}^/.*VIC01663918^/Default[/]?$^/VTScada(Light)?Branding.*^/favicon.ico^/vts.css/logout
Explainer:
- This rule matches the GUUID path pattern used in VTScada Anywhere Client. If you wish to be more precise and secure, you can change this rule to the actual GUUID seen in the browser URL path like this example, and make it “^/Default/48708544-07e3-4d1b-9b6e-ea8ace4b00fe”

2. This rule matches the Anywhere Client script path
3. This rule should bear the name of the Server realm. In this case “Default”. This should be made to match your Server realm
4. This rule matches the VTScada path for images and objects for both the Regular and Light version of the server
5. This rule matches the standard favicon.ico website icon
6. This rule matches the Style Sheets path
7. This rule matches a logout path that would be used to sign out of the VTScada application
We have now completed setting up your VTScada resource within the Agilicus platform. At this point you would want to create the appropriate Role Based Access Control permissions per the steps below:
Step 3: Add Permissions
- Select Access -> Application Permissions
- Grant Firewall Role (self) Permission of the application name (VTS) to the required Identity
Step 4: Configure VTScada
From the VTScada Application Manager, select the Server Setup dialog:
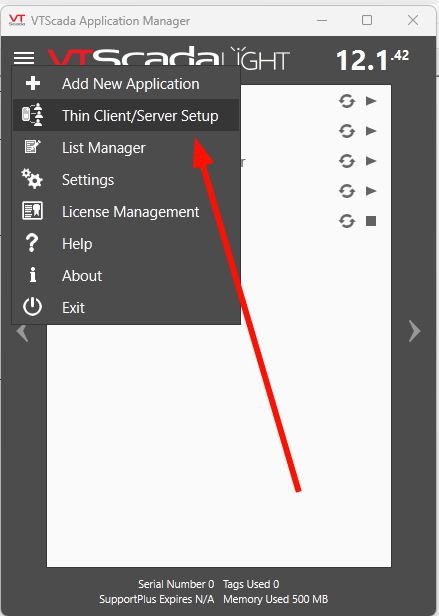
Select the “Connection Addresses” tab, select the “+” icon to create a connection address entry.
Enter the matching Agilicus Application name FQDN exactly as created in the “Connection Address” dialog, select port 443 and check “Secure“
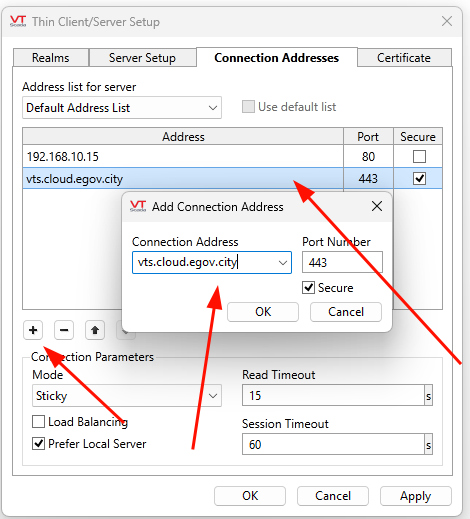
Click “Apply” to submit the new address. This will allow VTScada Anywhere Client to present a list of valid hostnames where the Anywhere Client is allowed to connect. Since the FQDN is the one we configured through the Agilicus platform, the VTScada Anywhere Client will be permitted to browse via the newly created service.
Want Assistance?
The Agilicus team is here for you. The ‘Chat‘ icon in the lower left, here, or in the administrative web page, goes to our team.
Or, feel free to email support@agilicus.com
Not yet a customer? The TRY NOW button will walk you through the process.