

Policies
Setup Resource Access policies, including multi-factor, geo-ip.
Overview
There are 3-phases in the life cycle of usage: Authentication, Authorisation, Access. People commonly refer to ‘multi-factor authentication’, which enriches the information a user must know/have/be in order to properly authenticate themselves.
However, some security policies cannot be modelled simple as “do I know who this person is” in the authentication phase. These must be evaluated continually, rather than once when the user provides credentials. Below are a few example security policies that cannot be modelled solely with authentication.
Multi-Factor Required on Time-Interval or Based on Location
Imagine a user signs in on a device, and gets an ID Token, an Access Token, and, a Refresh Token. They can now present the access token until it expires, and, refresh it with the refresh token. This could be good for 1 week as an example, and be appropriate for usage of the corporate wiki or email.
Now imagine there is an application of significant importance to the company. A breach of it would be have a larger downside than a breach of the wiki. The company has decided on a security policy such that the user must prove they are still in possession of the multi-factor device each 8-hour shift. This cannot be expressed with Authentication Rules.
GeoIP Restricted Access By Resource
Using Authentication Policies, we can control where a user is at sign-in time, but not where they are at time of use. Imagine a singular resource which requires a tighter knowledge of the user’s location proxied by IP. It might require allowing only from a specific IP range, or, only from certain countries, or, from everywhere except certain countries.
Time-Based Access: Days, Times and Dates
The third policy type is Time-based. It restricts access to a schedule. On the Policy Schedule Type step you choose between two forms:
- An explicit chunk of time, with a Start Date and an End Date. Use it for a one-off window, such as a maintenance period or a contractor engagement that ends on a known date.
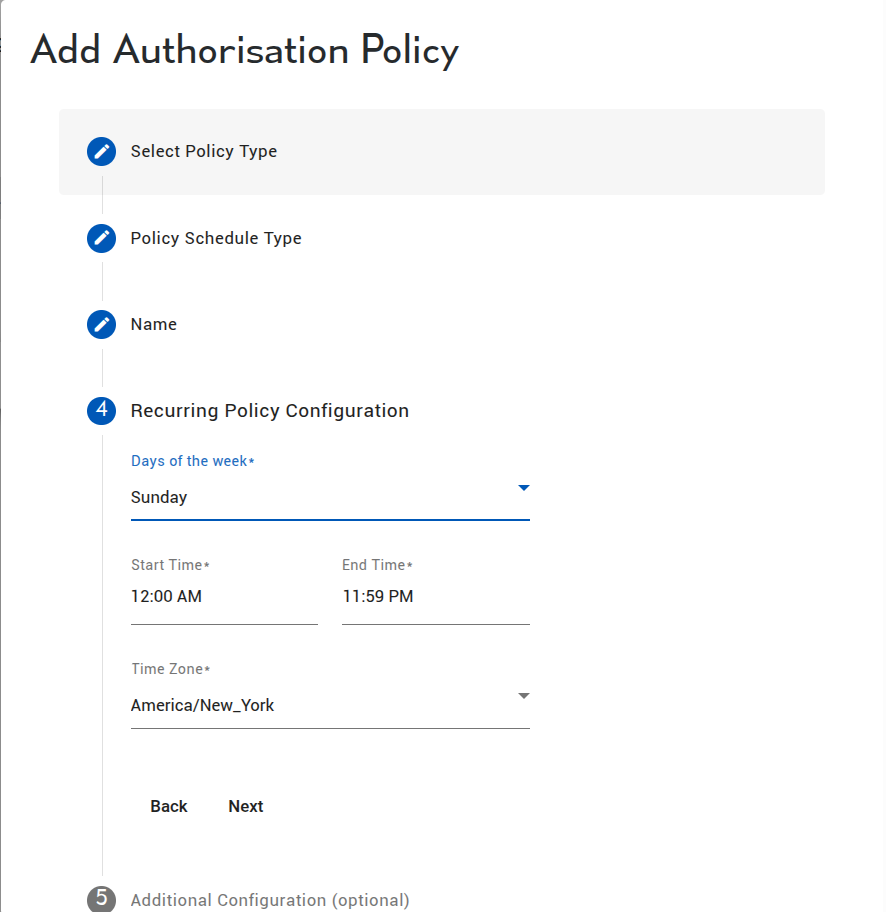
- A recurring schedule, with days of the week, a start time, an end time and a time zone. Use it for business hours, or for a weekly window such as Sunday only.
Both forms mean the same thing: the schedule is the allow window. The policy compiles to a single rule that denies a request when it falls outside the schedule. Inside the schedule the rule adds nothing, so a request is still allowed only if a permission or another policy grants it.
Five details decide the outcome at the edges:
- The days and the times are evaluated in the time zone you select, at the moment of the request. A request at 00:30 on a Monday in America/New_York is a Monday, even though it is still Sunday in UTC.
- The start and the end are inclusive to the minute, and seconds are ignored. 12:00 a.m. to 11:59 p.m. covers the whole day, through 23:59:59.
- A deny outranks an allow. If any policy denies, the request is refused, whatever the other policies say.
- The policy applies to the resources that carry the labels you choose. With no labels it applies to every resource in the organisation, which is rarely what you want. For a resource that a client opens in parts, such as a launcher, label the launcher and every resource it starts, or put them all in a resource group and label the group.
- Keep every day that you need in one policy. Two policies, one for Monday and one for Tuesday, deny on both days, because each one denies outside its own window.
A window that crosses midnight is not the same as an evening that runs into the next day. The day list and the time range are evaluated separately, so Tuesday 10 p.m. to 6 a.m. also matches Tuesday 00:00 to 06:00. For a whole day, use 12:00 a.m. to 11:59 p.m.
Restrict the audience with permissions, not with labels. A label scope matches a resource label, a user label, a group label or a permission label, and the labels in one policy are alternatives, so a policy on a user label applies to every resource that user touches. To allow one user a Sunday window on one launcher, label the launcher and grant the permission only to that user.
Configuration
Policies are created in isolation, and then attached to resources via labels. A policy can apply to multiple resources.
Step 1: Create Label To Attach Policy
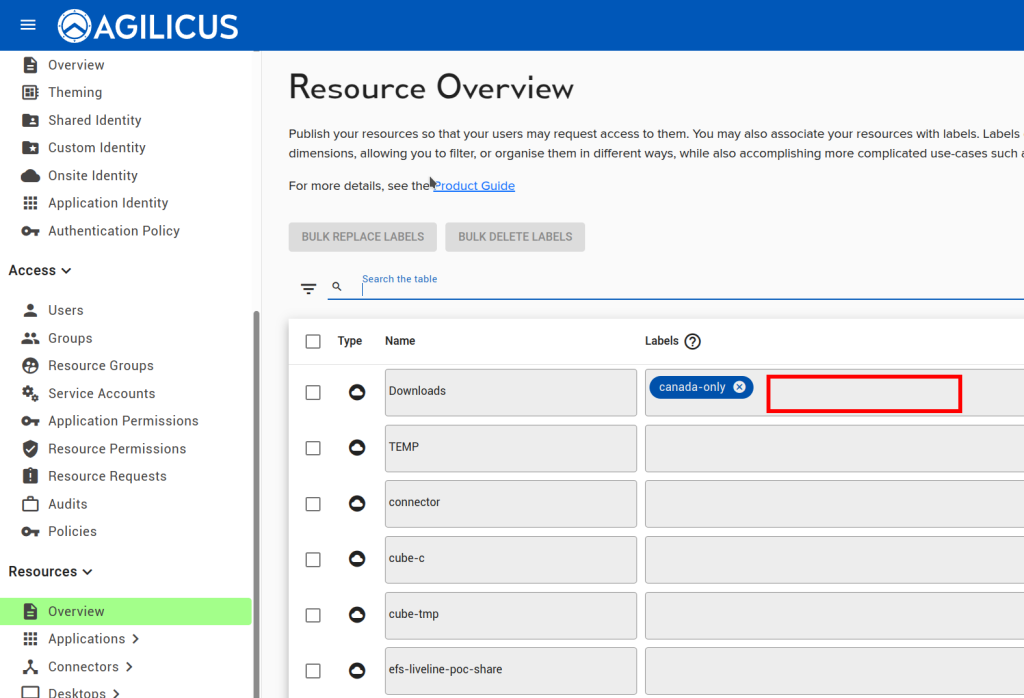
Navigate to Resources/Overview. On the first resource you intend the policy to affect, type a name for it on the right (e.g. ‘canada-only’).
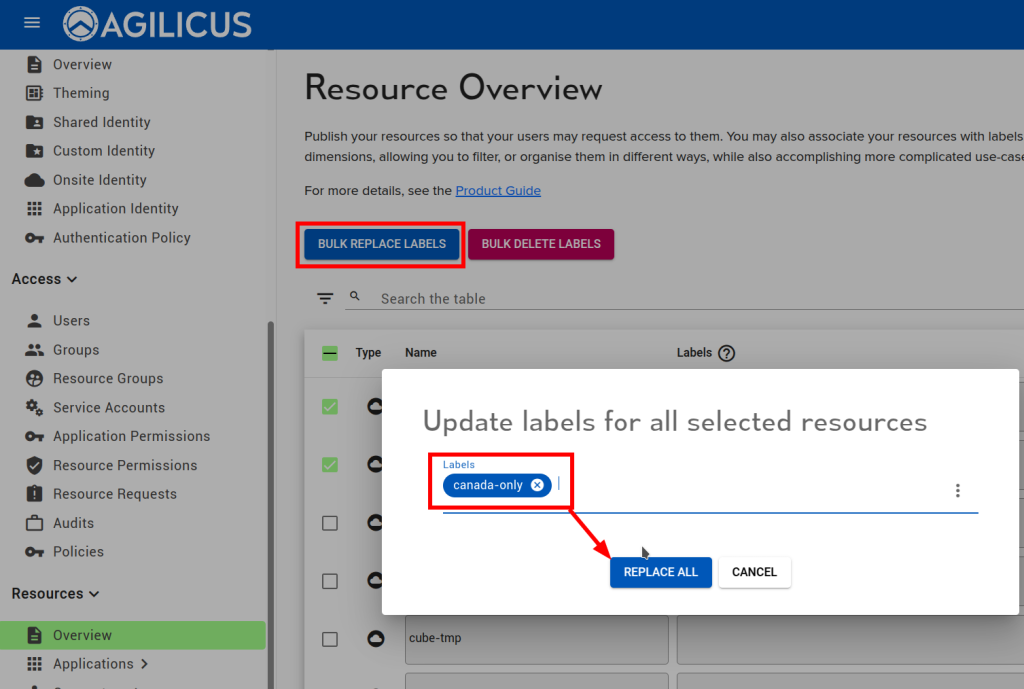
Now, select all resources to which it should apply, and then select ‘BULK REPLACE LABELS’, enter the name of your new label.
Step 2: Create Policy (Geo-IP / IP Restriction)
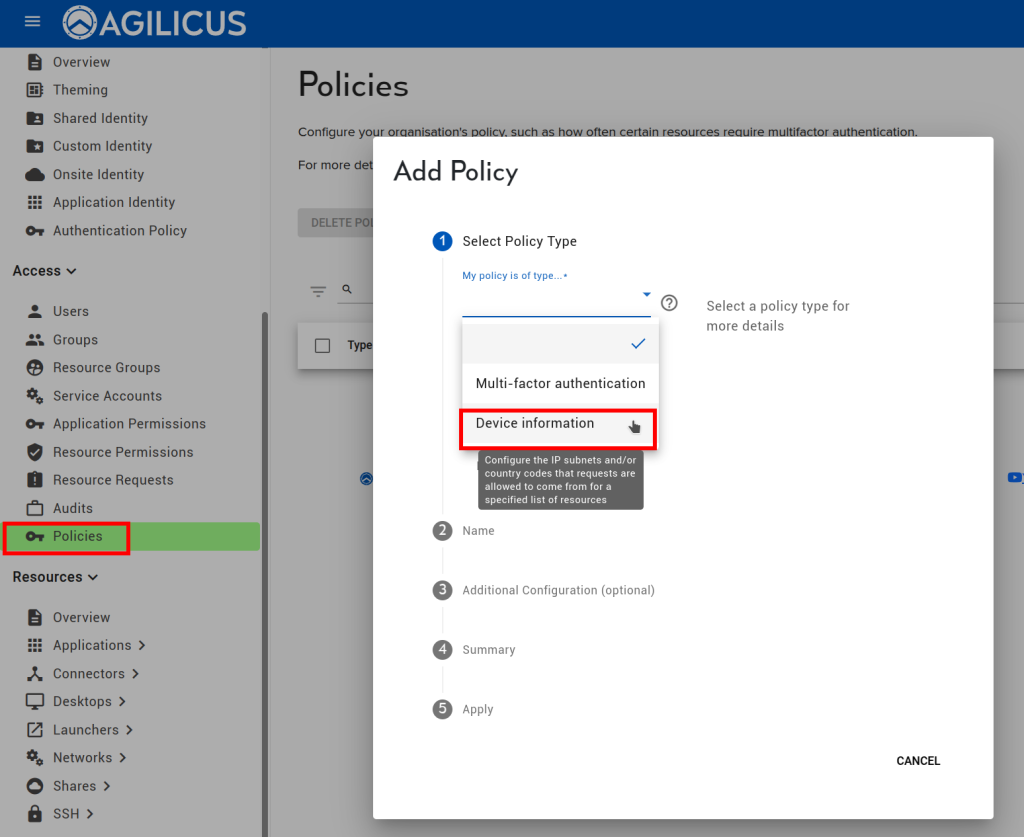
From Access/Policies, select NEW. Select ‘Device Information’, indicating that we will be using information relating to the user’s device for the policy.
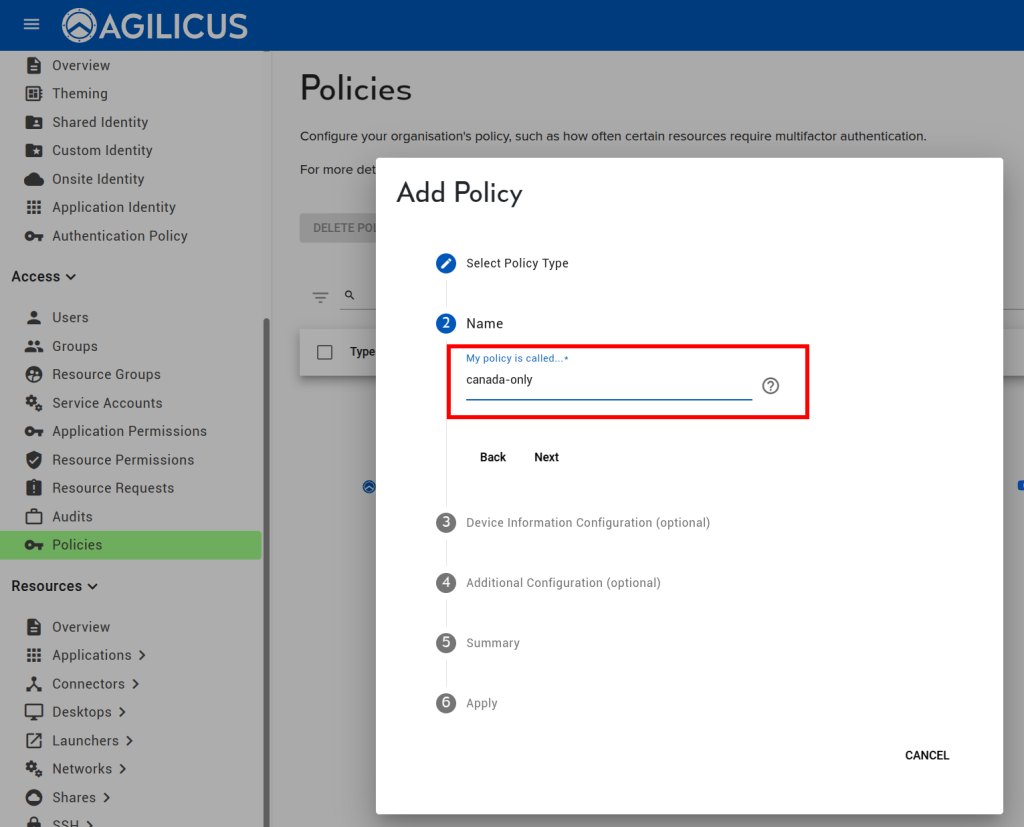
Give the policy a name. Here we have used the same name as the label, but you can use any.
Configure the policy. Here as an example we will select the ‘country codes’, and, select CA for Canada.
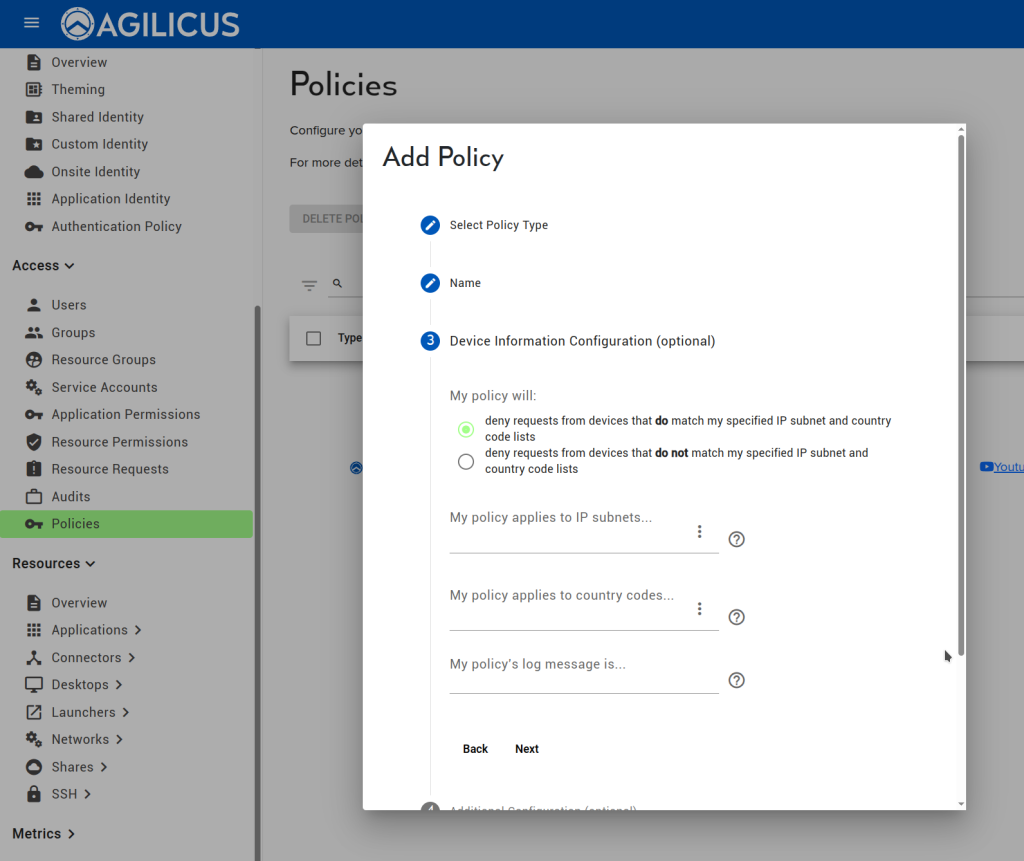
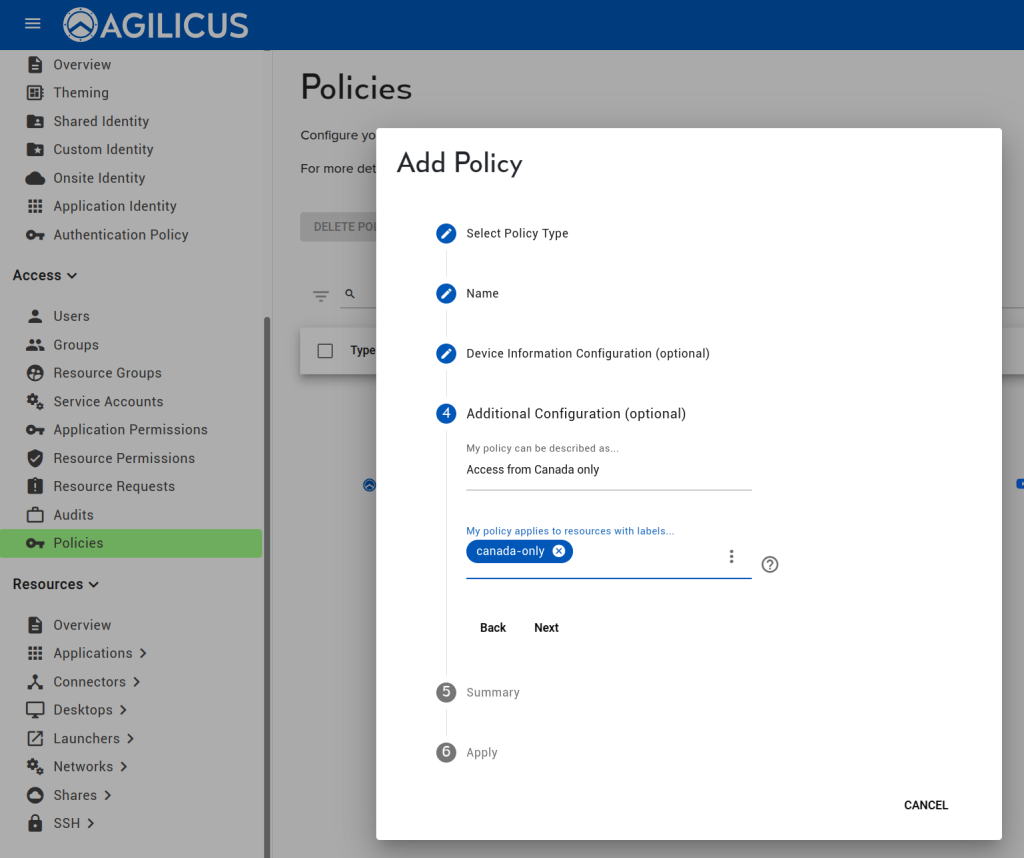
Enter some information describing this policy (e.g. why you created it), and, the label from above. This policy will now apply to all resources with that label (you can later navigate to Resources/Overview to apply it to more new resources).
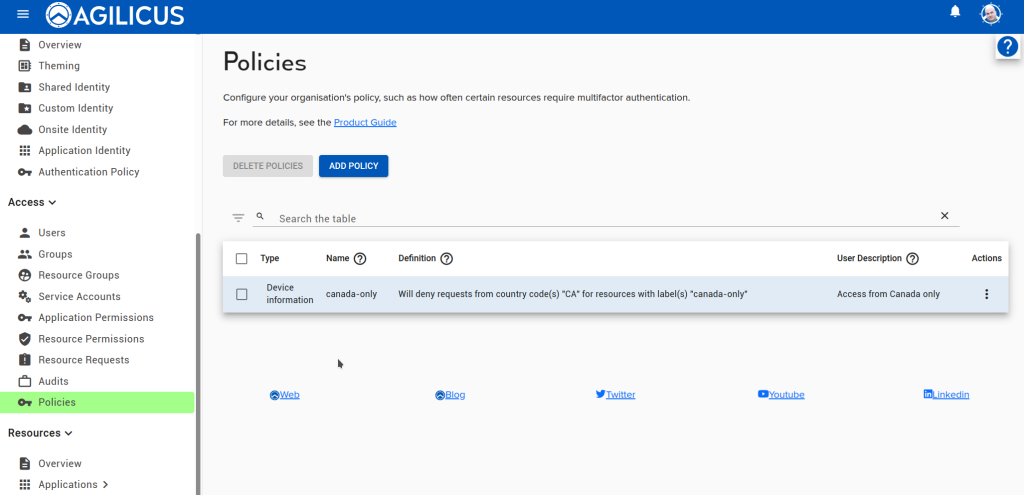
We can now see the policy in the table, and it should be active within a few seconds.
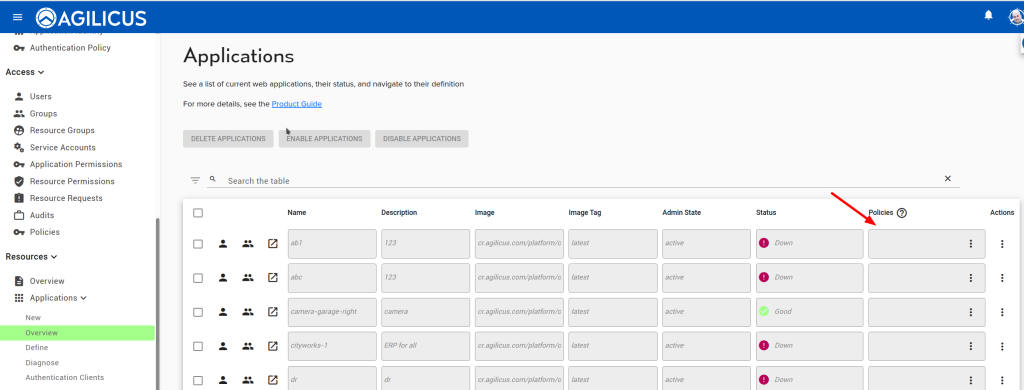
If you wish, you may manually apply policies
Step 3: Create Policy (Time-Based, Recurring)
As a worked example, allow one user to reach a launcher on Sunday only, and deny access at every other time.
- On Resources/Overview, select the launcher and every resource it starts, select BULK REPLACE LABELS, and enter a new label such as sunday-launcher (see Labels).
- On Access > Resource permissions, create a permission for that one user on the launcher, at the level they need. Only that user can reach the launcher, so the schedule applies to them alone.
- On Access > Policies, select ADD AUTHORISATION POLICY. On Select Policy Type choose Time-based.
- On Policy Schedule Type choose Yes, this is a recurring schedule of time.
- On Name, enter a name such as sunday-launcher-only.
- On Recurring Policy Configuration choose the day Sunday, Start Time 12:00 a.m., End Time 11:59 p.m., and Time Zone America/New_York. Use the time zone in which the schedule is defined, not the time zone of the users.
- On Additional Configuration (optional), describe the policy and add the label sunday-launcher.
- Review the Summary, then on Apply select Add. The definition in the policy table reads "Applies on Sunday between 0:0 and 23:59 (America/New_York)", which means access is permitted in that window and denied outside it.
Test it from both sides. While signed in as that user on a Sunday, start the launcher: it opens. On any other day the connection is refused, and the audit log records the denial against the policy.
A policy change takes a few seconds to reach the proxy. Reload the policy table before you retest.
For a one-off window instead, choose No, this is for an explicit chunk of time (start and end date) on Policy Schedule Type, then set the Start Date and End Date in the Timeframe Configuration step. The same rule applies: access is permitted inside the window and denied outside it.