Multi-Factor Authentication
I AM. I HAVE. I KNOW
Enable this best-practice on any application, for any user, regardless of authentication identity provider.
Multi-Factor Authentication Configuration
See background on Multi-Factor Authentication.
In this implementaiton of Multi-Factor Authentication, the user is prompted to authenticate to their upstream identity provider, and, then, a multi-factor challenge is provided via web.
State can be kept in a secure cookie on the ‘auth.DOMAIN’ endpoint. This can allow single-sign-on with multi-factor as well as only requiring a 2nd factor over some time interval.
Supported Methods: WebAuthn
The Web Authentication (WebAuthn) standard is the current best practice. It allows seamless integration of platform-specific features (biometric, TPM) with external U2F and CTAP devices.
Browsers and versions supporting WebAuthn can be seen here.
WebAuthn is designed to be privacy preserving, no information on the user or device is shared with the network. This includes biometrics.

Supported Methods: TOTP (Time based challenge app)
A time-based one-time password (TOTP) is a universal standard, implemented by many applications (including Authy, Google Authenticator).
TOTP is private (there is no network communication flow) and works even without a graphical or browser flow.
Agilicus’ implementation works with all TOTP-supporting applications, however, we recommend Authy.
Our strategy is to not supply “yet another” TOTP application. Instead, we recommend users use a common one across all websites, including ours.
Web Push
Web Push uses a network authentication profile called VAPID. This is designed to be entirely private: there is no way to identify the user or device receiving the push. In the Web Push model, the user’s browser (whether open or not) will receive a ‘push’ “WAS THIS YOU” message when you try to login, even on another device.
Web Push is secure and convenient. However, the major downside is Apple, which does not support push methods. There is a petition requesting support.

Authentication Rules
Authentication Rules are a type of Conditional Access. They are logically part of the authentication flow, after he user has proven identity. These rules can augment the logic with things like:
- has provided multi-factor authentication
- is in / not in IP ranges
- application properties
- user properties
- device properties
The system has a set of policy presets. These operate like macros, overriding the current rules and then leaving them free to configure.
See more information on Authentication Rules.
Three presets are provided:
Default
You should choose this option for strong security and convenience for your users. Using a single identity source of truth among many applications enables maximal ease of use, while enabling multi-factor-authentication ensures that anyone without physical access to their device(s) cannot compromise the account. You will always be able to revoke a user’s access at any time and audit their usage of any applications or services. Details: Multi-factor authentication can be enabled per client, by default it will follow a user’s preference A user’s session is shared between apps unless that app’s client has Single Sign-On set to ‘never’ A user’s session lasts up to 7 days Multi factor authentication must be used to log in after every 30 days if a multi-factor authentication method has been configured
Permissive
You should choose this option if the data you need to get to your employees needs to be protected, but is not of a particularly sensitive nature. This option enables low barrier to entry to get as many users as possible onto the system with as little administrative overhead as possible. You will always be able to revoke a user’s access at any time and audit their usage of any applications or services. Details: Multi-factor authentication can be enabled per client, by default it will follow a user’s preference. A user’s session is shared between apps unless that app’s client has Single Sign-On set to ‘never’ A user’s session lasts up to 14 days Multi factor authentication must be used to log in after every 30 days if enabled
Strict
You should choose this option if you need the minimum ‘blast’ radius from a compromised device. By reducing the sharing of sessions between applications, minimizing multi-factor authentication duration and requiring frequent logins you can guarantee that in the event an employee’s device is compromised they cannot access anything other than what the employee is currently logged into. You will always be able to revoke a user’s access at any time and audit their usage of any applications or services. Details: Multi-factor authentication can be enabled per client, by default it will follow a user’s preference A user’s session is not shared between apps unless that app’s client has Single Sign-On set to ‘always’ A user’s session lasts at most 1 day Multi factor authentication must be used to log in every 7 days
Trust On First Use
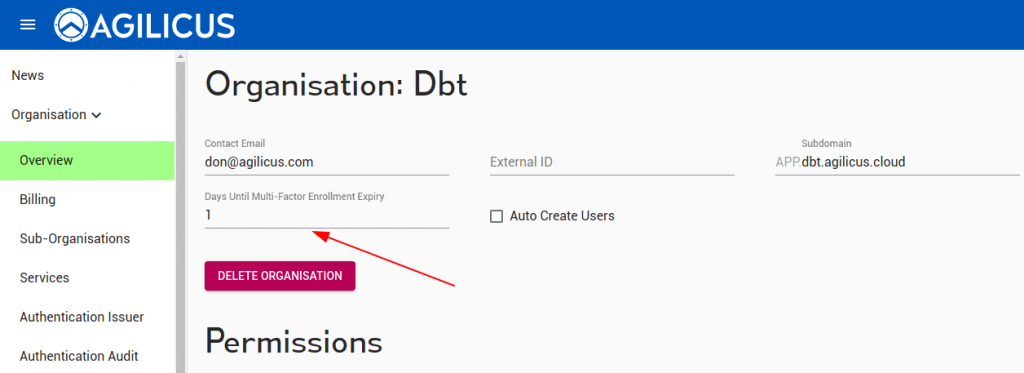
Agilicus recommends a ‘Trust On First Use’ method of self-enrolment. In this model, a user is forced to setup their second-factor on the next sign-in, with a maximum deadline.
The deadline is set organisation wide, and is the delta from when the user is created until when they must have successfully demonstrated a 2nd-factor setup.

End-User Setup (Profile)

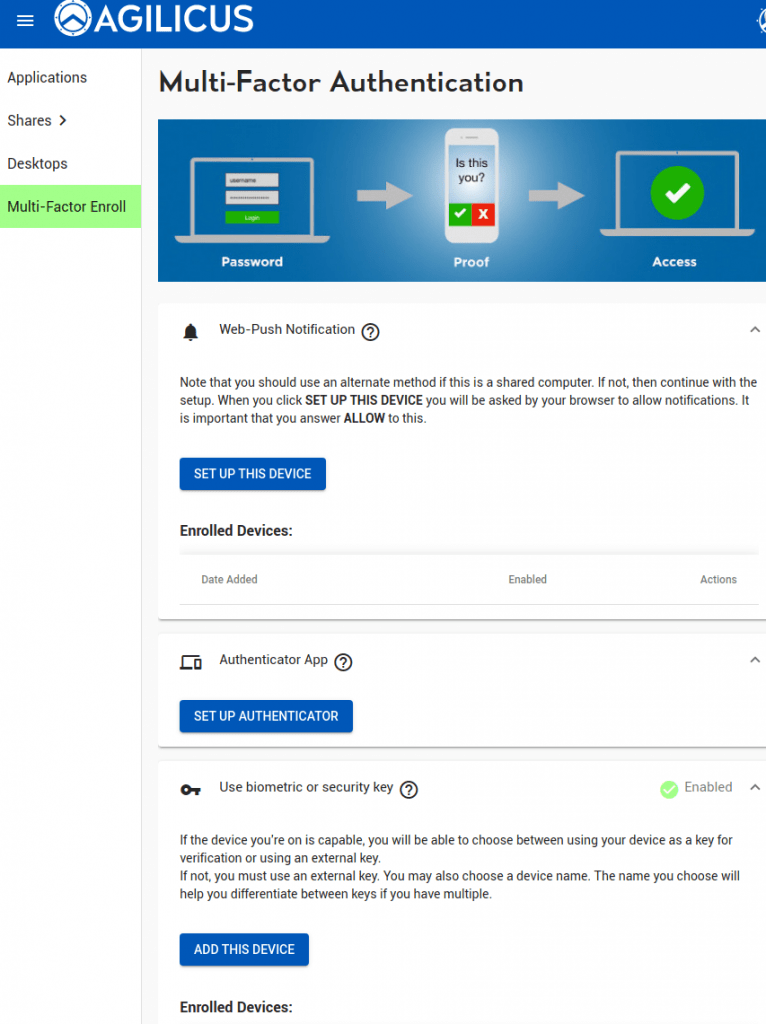
The end user may manually navigate to “Profile” (via https://profile.DOMAIN). They may also install it as a Progressive Web App (PWA), making it appear as a mobile-native application.
In the Profile, the user may setup whichever multi-factor methods their organisation has chosen to support.
if trust on first use is used. the user will be forced here on their first login within the enrolment period.
Diagnostics and User Audit
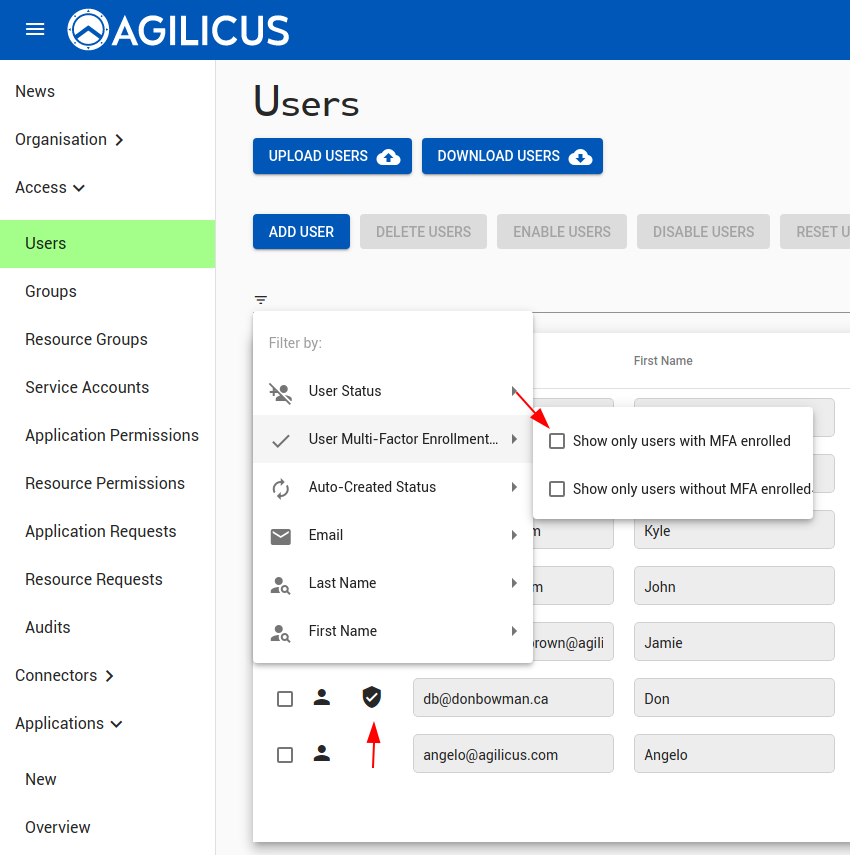
We can see which users have multi-factor setup in the ‘Users’ screen (via the shield). We can also filter to show only user with/without multi-factor authentication enabled.
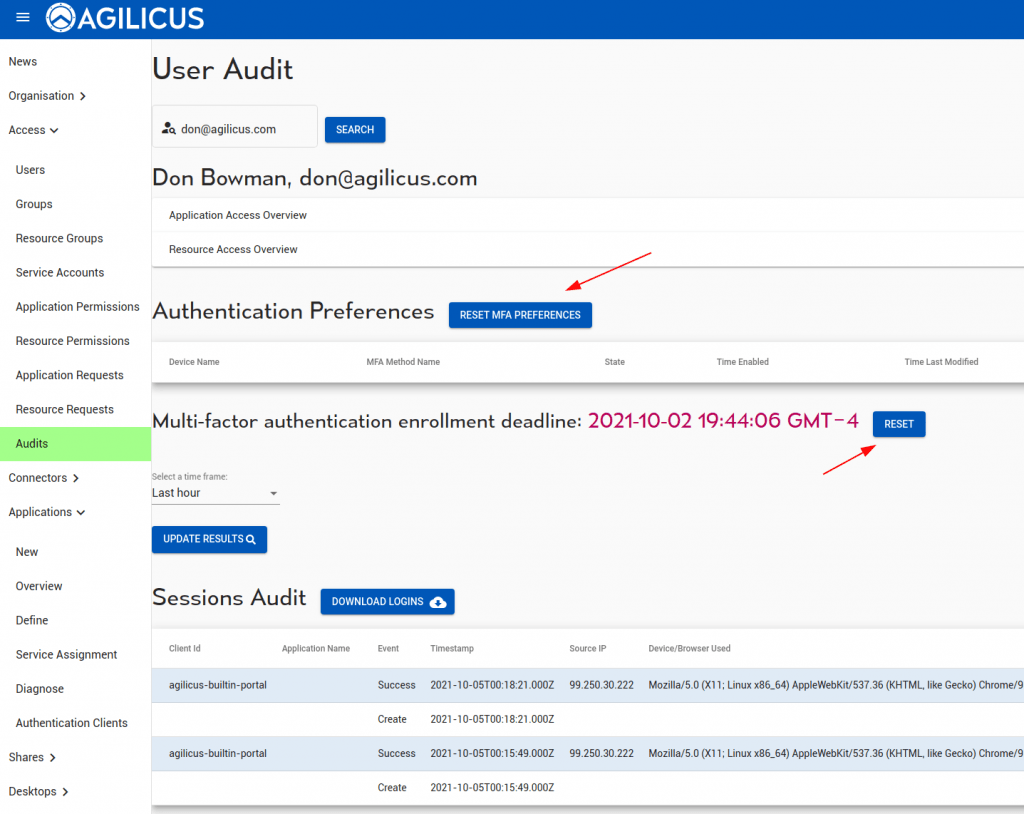
The “RESET” users option will unset the multi-factor setup & preferences of a user.

We can see the multi-factor sessions and preferences (as well as all other audit information) of a given user on the audits screen. Here too we can reset the trust-on-first-use timeline.
