Connector Install: Raspberry Pi
Modular single board computers (such as a Raspberry Pi) makes an excellent platform to run the Agilicus Connector.
The below instructions were tested on a Raspberry Pi 4, specifically:
# cat /etc/debian_version
10.12
# cat /etc/os-release
PRETTY_NAME="Raspbian GNU/Linux 10 (buster)"
NAME="Raspbian GNU/Linux"
VERSION_ID="10"
VERSION="10 (buster)"
VERSION_CODENAME=buster
ID=raspbian
ID_LIKE=debian
HOME_URL="http://www.raspbian.org/"
SUPPORT_URL="http://www.raspbian.org/RaspbianForums"
BUG_REPORT_URL="http://www.raspbian.org/RaspbianBugs"
During the installation, a Service Account will be created (permissions for the Agent Connector to run as). See “Connector Sign-In” for more information.
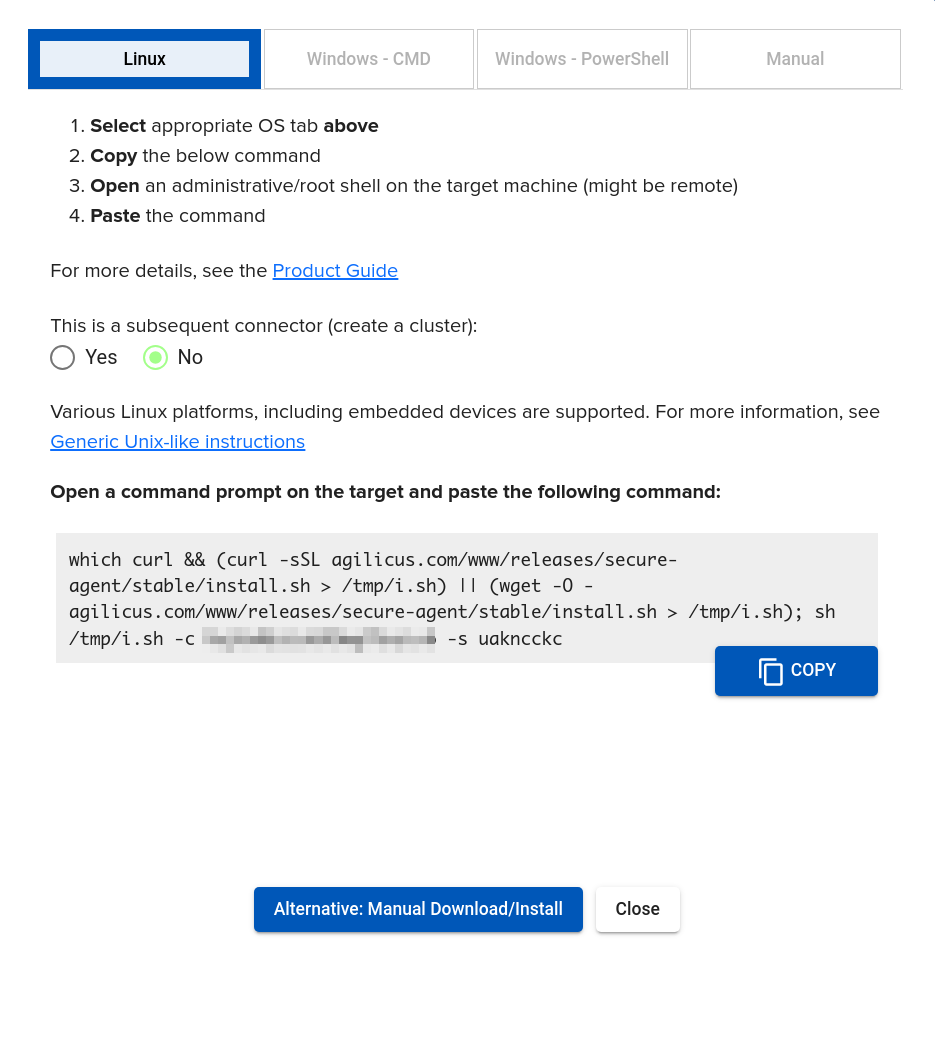
The Raspberry Pi installation uses the same instructions as the Linux ones (image at right) A sample command line is offered in the Agilicus admin porttal, which may be pasted into the ssh shell.
Once you run this command, you will see output as below. Select the URL you are given, open it in your browser, and you will see a code. Paste this back into the ssh shell after it says ‘Enter verification code’.
You are now complete. The Agilicus Connector can now be configured from the Admin portal (https://admin.YOURDOMAIN) as on all other platforms.
The Agilicus Connector will self-update over time, no intervention is required.
We may check the status once installed as below.
Logs (if any) are generated to /var/log/agilicus-agent.log (e.g. run ‘tail -F /var/log/agilicus-agent.log’)
We may check the status once installed as below.
# systemctl status agilicus-agent.service
โ agilicus-agent.service - Agilicus Agent
Loaded: loaded (/etc/systemd/system/agilicus-agent.service; enabled; vendor preset: enabled)
Active: active (running) since Sun 2022-04-03 15:30:51 EDT; 7min ago
Main PID: 1218 (agilicus-agent)
Tasks: 7 (limit: 4915)
CGroup: /system.slice/agilicus-agent.service
โโ1218 /usr/bin/agilicus-agent client --cfg-file /etc/agilicus/agent/agent.conf.enc.yaml
Apr 03 15:30:51 raspberrypi agilicus-agent-wrapper.sh[1218]: Starting agilicus-agent...
Logs (if any) are generated to systemd journal, and may be watched in real-time with:
# journalctl -fu agilicus-agent
Apr 03 15:30:51 raspberrypi agilicus-agent-wrapper.sh[1218]: Starting agilicus-agent...
Apr 03 15:30:53 raspberrypi agilicus-agent-wrapper.sh[1218]: time="2022-04-03T15:30:53.688077855-04:00" level=info msg="Starting client - version v0.103.1"
Apr 03 15:30:53 raspberrypi agilicus-agent-wrapper.sh[1218]: time="2022-04-03T15:30:53.75134192-04:00" level=info msg="No tuf metadata, re-create localstore"
...
Sample Install Log
The complete log of a sample install is below (in Sample Install log). Note that the agent-id has been replaced with XXXX, the url with auth.YOURDOMAIN.
root@raspberrypi # /tmp/agilicus-agent-arm client --noauth-local-webserver --install --agent-id XXXXXX --oidc-issuer https://auth.YOURDOMAIN
INFO[2022-04-02T20:47:18.73380792Z] Starting client - version v0.103.0-2-g6426ea9
INFO[2022-04-02T20:47:20.051496565Z] Logging in...
Please go to the following link in your browser to retrieve the authentication
code:
https://auth.YOURDOMAIN/auth?client_id=agilicus-builtin-agent-connector&code_challenge=XXX&code_challenge_method=S256&redirect_uri=urn%3Aietf%3Awg%3Aoauth%3A2.0%3Aoob&response_type=code&scope=openid+profile+email+offline_access+urn%3Aagilicus%3Aapi%3Aapplications%3Areader%3F+urn%3Aagilicus%3Aapi%3Aapplications%3Aowner%3F+urn%3Aagilicus%3Aapi%3Atraffic-tokens%3Aowner+urn%3Aagilicus%3Aapplication_service%3A%2A%3Aowner%3F&state=1648932440
Enter verification code: XXXXX
INFO[2022-04-03T15:30:41.423956968-04:00] Check if the agilicus-agent is already running as a service. If so stop it
INFO[2022-04-03T15:30:41.452256288-04:00] Create a directory at /etc/agilicus/agent
INFO[2022-04-03T15:30:41.453458658-04:00] Download public key file to /etc/agilicus/agent/public_key.json
INFO[2022-04-03T15:30:41.669511297-04:00] Create file /usr/bin/agilicus-agent-wrapper.sh
INFO[2022-04-03T15:30:41.669721908-04:00] Create file /etc/systemd/system/agilicus-agent.service
INFO[2022-04-03T15:30:41.681074365-04:00] Will install to /agilicus-agent-wrapper.sh -> {/usr/bin/agilicus-agent-wrapper.sh -rwxr-xr-x}
INFO[2022-04-03T15:30:41.684546753-04:00] Will install to /agilicus-agent.service -> {/etc/systemd/system/agilicus-agent.service -r--r--r--}
INFO[2022-04-03T15:30:41.685288845-04:00] Create a directory at /opt/agilicus/agent/tufmetadata/latest
INFO[2022-04-03T15:30:41.685374271-04:00] Create a directory at /opt/agilicus/agent/tufmetadata/stable
INFO[2022-04-03T15:30:41.687910381-04:00] Setup Agilicus secure store
INFO[2022-04-03T15:30:41.688017344-04:00] Create secure keyring for storing communication credentials in /etc/agilicus/agent
INFO[2022-04-03T15:30:49.366277822-04:00] Fetch agent configuration
INFO[2022-04-03T15:30:49.366353062-04:00] Write agent configuration file in /etc/agilicus/agent/agent.conf.enc.yaml
INFO[2022-04-03T15:30:50.569323937-04:00] Create a user and group named Agilicus to run the agilicus-agent service
INFO[2022-04-03T15:30:50.569467641-04:00] Copy executable to /opt/agilicus/agent
INFO[2022-04-03T15:30:50.56955203-04:00] Set permissions to Agilicus on /opt/agilicus/agent
INFO[2022-04-03T15:30:50.569648345-04:00] Create symlink from /usr/bin/agilicus-agent to /opt/agilicus/agent/agilicus-agent-arm
INFO[2022-04-03T15:30:50.830448906-04:00] Start agilicus-agent service
INFO[2022-04-03T15:30:51.338667395-04:00] Installation Complete
Related Configuration
Return to Product Configuration
- VNC Desktop
- Agilicus Connector – NanoPI R5S
- Agilicus AnyX Product Updates
- Agilicus Connector – Microsoft Windows
- Sign-In Errors
- Time Synchronisation
- Locked-Down Networks Certificate Revocation
- Signup: Firewall Configuration
- Geo-Location-Based Access Control
- Agilicus Connector Sign-In
- Resources – Overview, Concepts
- Connect to VTScada – Adding a Web Application
- Web Application Security
- Administrative Users
- Define Application: Proxy
- Authorisation rules
- Real VNC & Raspberry Pi
- Connector Install: Raspberry Pi
- Kubernetes Connector Install
- Linux, FreeBSD, Embedded Connector Install
- Connector Install: Ubiquity EdgeRouter X
- Audit Destinations
- Agilicus Connector Install: MikroTik RouterOS
- Connector Install: Netgate SG-1100 pfSense
- Identity Group Mapping
- Billing
- Auto-Create Users From Specific Domain With Google Workplace
- Organisation
- Authentication Audit
- Authentication Issuer – Custom Identity
- Signup
- Microsoft ClickOnce
- Groups
- Agilicus Connector Windows Cluster
- Launchers
- Forwarding
- Usage Metrics
- Service Accounts
- Identity & Authentication Methods
- Content Security Policy
- Users
- Sign-In Theming
- Sign in With Apple
- Azure Active Directory
- Sign in With Microsoft
- Agilicus Launcher (Desktop)
- Agilicus-Connector
- Zero-Trust SSH Access
- Theory of Operation: CNAME + DOMAIN
- Zero-Trust Desktop Access
- Command Line API Access
- Applications
- Permissions
- Profile
- Multi-Factor Authentication
- Authentication Rules
- Application Request Access
- OpenWRT Connector Install
- Synology Connector Install
- Authentication Clients
- Authentication Rules
- Shares
- Services
- Resource Permissions
- Resource Groups
- Legacy Active Directory