# Example: Vadim-Icity
Municipalities rely on Vadim-Icity for critical operations, yet the software often requires local desktop access. Agilicus AnyX enables remote use of this desktop client without a virtual private network or complex network reconfigurations. This platform maintains operational continuity for hybrid workforces by securely intercepting traffic and syncing files locally.
Technical implementation involves deploying a connector and configuring application launchers to manage database connections and file shares. By establishing a custom protocol, the system reroutes backend database traffic while ensuring secure identity-based authentication. This structural approach simplifies remote access for staff without requiring changes to the core application.
Using the power of the Agilicus AnyX platform, empower your remote workers to access the complete desktop Vadim-Icity experience from anywhere.
[Contact](https://www.agilicus.com/contact-us/)
Signup
## Background
For many municipalities, Vadim-Icity is an important part of their operations. It's used for managing everything from financials and human resources to property taxes and utility billing. It’s a tool that underpins many of the daily processes that keep a city running. But what happens when the people who need to use it can't be at their desks?
Much of the functionality of Vadim-Icity is only accessible only through its desktop client. This creates challenges for remote and hybrid work environments.
Using Agilicus AnyX platform, the full desktop software can be run remotely, from any windows PC connected to the internet. All this without a VPN, without any DNS magic and without changing how it runs.
## Technicals
Vadim is a web application, that uses URL links to launch desktop components. Generally, these components are available over a Windows share. It uses URL links registered on the local computer in order to launch the desktop components. In order for the software to work remotely, we will create a new URL type "agilicus-vadim", and rewrite the links that launch the software off of your local share, to instead use a copy made on the local machine. The new link will then use the Agilicus [launcher](https://www.agilicus.com/anyx-guide/launcher-install-desktop/) in order to first sync the remote files using rclone, then to reroute traffic coming from the desktop client to the remote Vadim-Icity SQL backend.
This guide uses the following Agilicus AnyX components
- A [connector](https://www.agilicus.com/anyx-guide/agilicus-connector/) to facilitate access to the backend components and files
- An [application](https://www.agilicus.com/anyx-guide-topic/web-application/), to enable remote users to access the web site remotely
- A [share](https://www.agilicus.com/anyx-guide-topic/share/), to enable remote users to access vadim files remotely
- A network, to access the backend SQL server
- A [launcher](https://www.agilicus.com/anyx-guide/launchers/) in order to manage launching the desktop application and reroute its database connection to the backend SQL server
Once set up, you require two components on the remote client machine
- The Agilicus AnyX [launcher](https://www.agilicus.com/anyx-guide/launcher-install-desktop/)
- A registry key that configures the agilicus-vadim protocol to launch the desktop application with network interception
## Install Steps
Create a [connector](https://www.agilicus.com/anyx-guide/agilicus-connector/). The connector is what provides access to your local site. Typically, it is installed on a VM local to the resources your are planning to share. Install it on machine with access to the vadim share, vadim web server and the backend database.
### Configure access to the Vadim web portal
For this step, you will configure an Agilicus [application](https://www.agilicus.com/anyx-guide/product-guide-applications). These enable remote users to access local web pages.
You will need to create a web application for your external users to access the Vadim finance portal.
In portal, admin.\_\_**MYDOMAIN**\_\_, go to the resources tab, select Resources->Applications->New.
Enter "vadim" as the application name, provide a description for reference and click "Next".
Under Access, leave the default option "from my site via an onsite connector (on-prem), and select the connector you created in the previous step. Enter the information required to access the configure it to connect to the same URL your users use to connect to the Vadim finance portal locally. click "Next".
For authentication, choose "is authenticated by a proxy", and leave the "optional: Enter the redirect after signin path" field empty. This will require users to sign through Agilicus before they can access the application. You have full control over who you allow to access the site, and users who you haven't allowed will never be able to access the site.
Under [authentication](https://www.agilicus.com/anyx-guide/product-guide-applications/#application-authentication) you will need to configure how you control access to the Vadim Finance Portal on the Agilicus Platform. Choose "has named users with a single role".
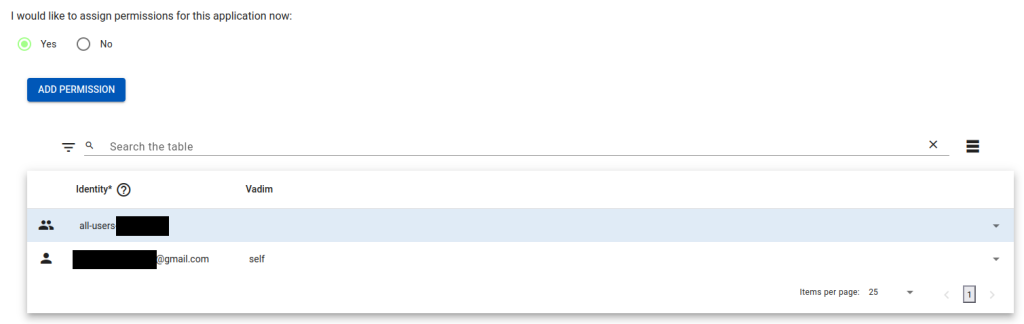
After configuring everything, click "apply". Once selected, choose "I would like to assign permissions for this application now". A table will popup. For simplicity, simpy assign yourself the Vadim "self".
 under Rewrite media types, choose
- Rewrite Host
- Rewrite Redirects
- Rewrite Origin
- Rewrite Set Cookie Header
- Rewrite Cookie
for Media types, ensure the following are set
- application/javascript
- application/json
- text/html
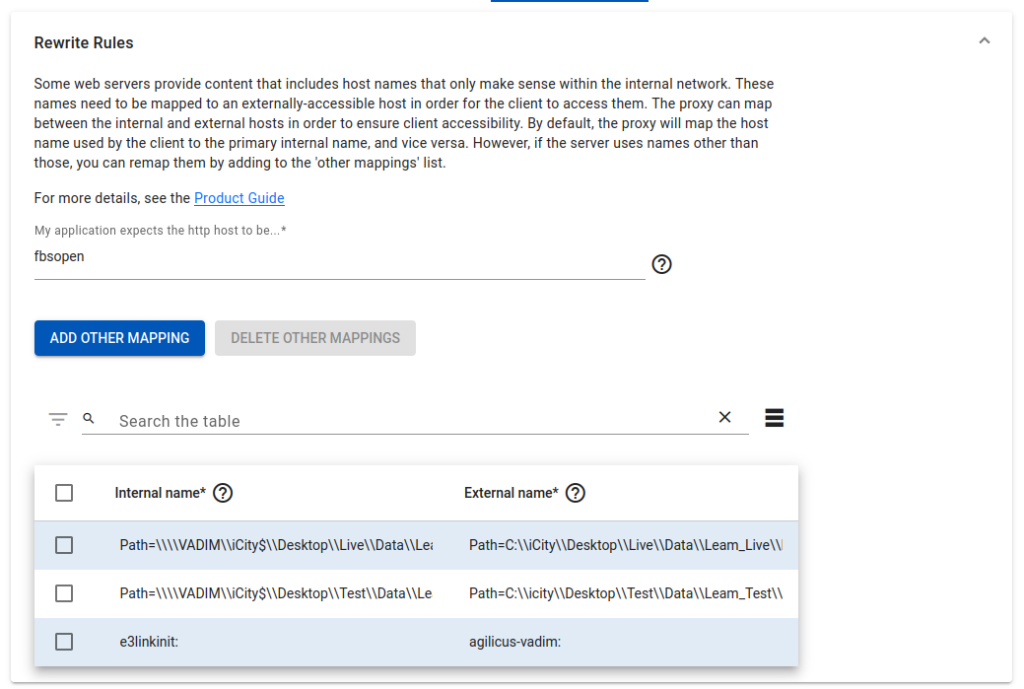
- text/javascript
 Under rewrite rules, configure the following additional mappings. You may have to correct the mappings if you use different paths to accessible vadim files locally, or if the paths are different for your installation. In this case the files are normally located as \\\\VADIM\\icity$, and we are installing the files to C:\\icity\\Desktop.
| Path=\\\\VADIM\\iCity$\\Desktop\\Live\\Data\\Leam\_Live\\Live\_appconfig\_Leam\_Live.ini | Path=C:\\iCity\\Desktop\\Live\\Data\\Leam\_Live\\Live\_appconfig\_Leam\_Live\_Agilicus.ini |
|---|---|
| Path=\\\\VADIM\\iCity$\\Desktop\\Test\\Data\\Leam\_Test\\Test\_appconfig\_Leam\_Test.ini | Path=C:\\icity\\Desktop\\Test\\Data\\Leam\_Test\\Test\_appconfig\_Leam\_test-agilicus.ini |
| e3linkinit: | agilicus-vadim: |
 At this point, you should be able to access the Vadim Finance web portal remotely, but desktop integration hasn't been set up yet. If you visit vadim.\_\_MYDOMAIN\_\_, you should see the page load and from here you can access your vadim instances.
### Configure access to the Vadim Database and Share
Create a network for accessing the vadim database backend, configure it to use port 1433. This can be done from the portal Resources->Networks. It will use the connector earlier, and should be named vadim, use the hostname of the SQL server for vadim, and with port 1433. This should use the connector installed earlier in the guide.
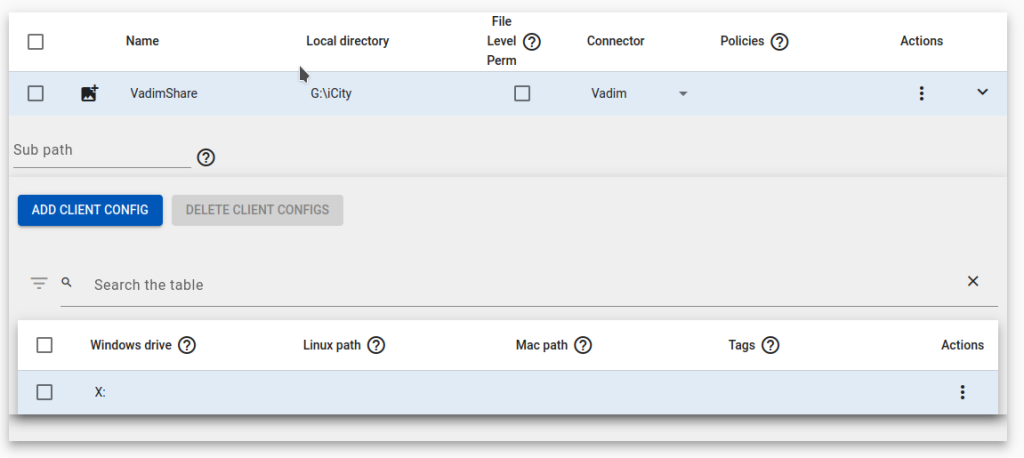
 Create a share from that connector to share vadim files. This is used in order to grant access to the files a remote end user would need to access to launch the desktop application. In this example, we name it VadimShare, and give it the path to the local files. Again, using the connector from earlier.
Configure the share with mount config to map it to an unused drive, EG X: or Y:
 You will need two launchers, one to configure the synchronization of the vadim software, and one to run the vadim integration. After this is configured, your users will be able to create a local copy of the vadim desktop software, and run it locally without any intervention. The vadim-sync launcher can be used to download and ensure the local copy of vadim software is up to date, and the agilicus-vadim launcher will be used by the vadim portal to launch the desktop software.
On the Resources->Launchers->overview, click "ADD LAUNCHER" to create a launcher for vadim. Name it "Agilicus-Vadim", click enable interception, add the vadim share and the vadim network for the backend. Configure the command path to be "C:\\iCIty\\Desktop\\CommandListenerAndProcessor\\CommandListenerAndProcessor.exe". We will create this file and add it to the share in a later step. When configured it will look like this:
 Create another launcher, this time name it Vadim Sync and only add the share. When configured it should look like this:
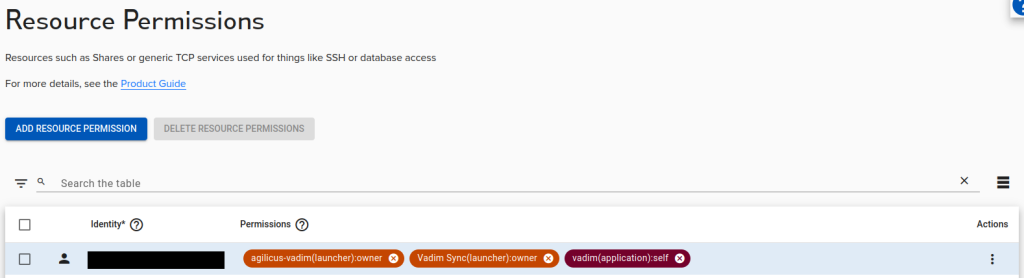
 You will also need to grant yourself permissions to use both launchers. Go to the Access->Resource Permissions page, and add permission to the two new launchers that were created to your user.
 ### Configuring the Vadim files for remote launching
on the vadim share, there are several configuration files that need to be added.
Duplicate the file \\Desktop\\Live\\Data\\Leam\_Live\\Live\_appconfig\_Leam\_Live.ini, name it \\Desktop\\Live\\Data\\Leam\_Live\\Live\_appconfig\_Leam\_Live\_Agilicus.ini. Open the file, and replace drive references to use the new drive location eg:
```
[MAGIC_LANGUAGE]
British Columbia = C:\icity\Desktop\Live\Language\Language_BC.dat
EGNB = C:\icity\Desktop\Live\Language\Language_EGNB.dat
Ontario = C:\icity\Desktop\Live\Language\Language_Ontario.dat
Standard = C:\icity\Desktop\Live\Language\Language_Standard.dat
USA = C:\icity\Desktop\Live\Language\Language_USA.dat
```
You will need to repeat this for \\Desktop\\Test\\Data\\Leam\_Test\\Test\_appconfig\_Leam\_Test.ini as well.
You will need to add the [rclone](https://rclone.org/) executable to your network share, as well as a simple bat script `vadim-sync.bat`. This script will sync the files necessary to run vadim before launching the program. On the first run, it will download all the files. If you wish to expedite this and avoid copying the files over the network, you can simply copy the \\desktop, \\test and \\app folders to the C:\\icity directory on the local machine.
```
:: vadim-sync.batset location=C:\icity
set shareURL=https://vadimshare.share.__MYDOMAIN__
set rcloneCommand=X:\rclone.exe
set https_proxy=
set http_proxy=
set HTTP_PROXY=
set HTTPS_PROXY=
%rcloneCommand% sync :webdav:/desktop %location%\Desktop --webdav-url=%shareURL% --webdav-vendor other --webdav-bearer-token-command "powershell.exe -Command \"$env:AGILICUS_ACCESS_TOKEN\"" --ignore-case --exclude "logs/*" --exclude "Desktop_Install_Logs/**" --exclude "Thumbs.db" --exclude "*Desktop_kit*"
```
### Local setup for Vadim Desktop
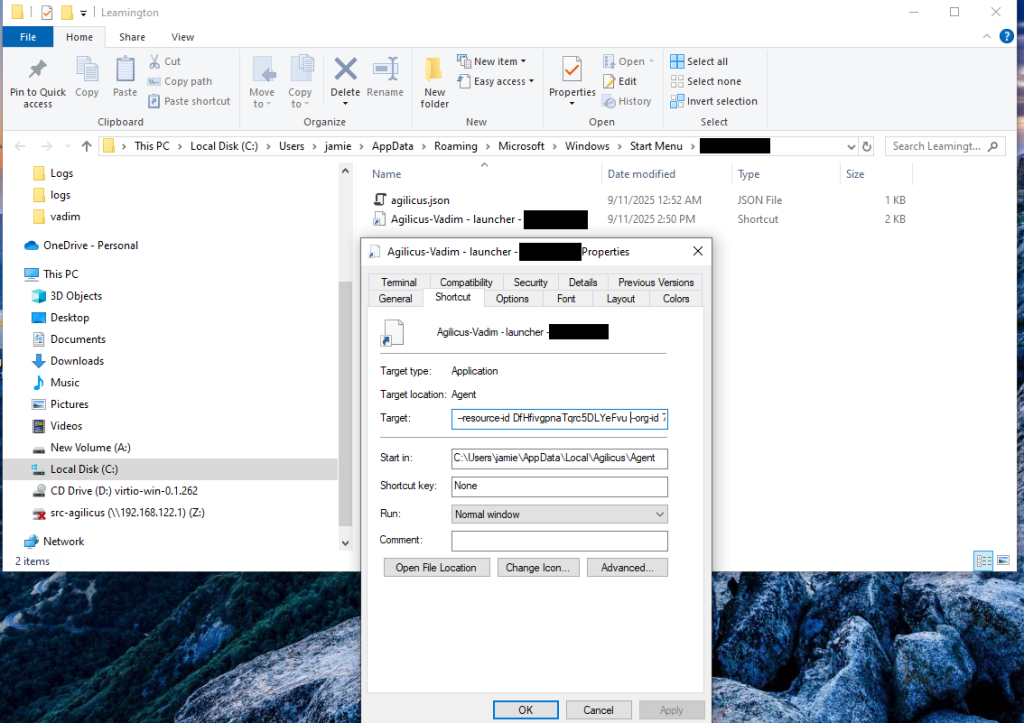
For the next step, you will need your Org ID and the launcher id for the agilicus launcher.
To get the launcher id, install the agilicus [launcher](https://www.agilicus.com/anyx-guide/launcher-install-desktop/) desktop integration. Open start, click 'Refresh'. You should see a new start menu option "Agilicus-Vadim - Launcher". Right click this option, choose "Open file Location", then right-click on the shortcut and choose properties. Under target, you will find your resource ID and Org ID listed.
 Create a registry entry for the new "agilicus-vadim" url type. You will need the Org ID and the launcher id from the prior step to do this. You can't create registry strings keys for default entries using regEdit, so instead fill those out in the command below and run it using command prompt.
```
reg add HKEY_CURRENT_USER\SOFTWARE\Classes\agilicus-vadim\shell\open\command /t REG_EXPAND_SZ /d "`"^%localappdata^%\Agilicus\Agent\agilicus-agent.exe`" proxify --cfg-file `"^%LocalAppData^%\Agilicus/Agent/agent.conf.enc.yaml`" --resource-id --org-id --args-modify s?agilicus-vadim?e3linkinit --debug --auto-http-proxy=false `"%1`""
```
Afterwards, you can export the key as a .reg file and install it that way on client machines, or you can roll out the change with group policy. It won't interfere with existing users, as it is adding a totally new URL handler.
At this point, you should be able to access the vadim web site remotely, as well as launch desktop client. This requires the registry entry above, and the agilicus launcher installed on the local machine. To test out desktop integration, you should be able browse to vadim.\_\_MYDOMAIN\_\_, choose desktop integration and run the apps locally. On the first try, it may take a few minutes and exit with an error. This is caused by the token from the page timing out before the desktop integration launches. On the second try, it should open within a few seconds.
# Workstation install
For each user you want to use the Vadim launcher, complete the following steps:
- Add the user to both the Vadim Sync and Agilicus-Vadim launchers
- Install the Launcher on the workstation
- Add the registry key for the agilicus-vadim protocol
- Ensure the max file size for webdav is set https://www.agilicus.com/anyx-guide/product-guide-shares/#note-on-maximum-file-size
- Ensure that Drive is entered as a trusted Location so that executables can be run from it
- Run Refresh, followed by Vadim Sync through the Agilicus launcher. If you run the Vadim sync bat script directly, it won't work.